Expressions In Ink Suite

This stunning new Stampin’ Up! Expressions In Ink Suite is my favorite of all times!! The paper is just amazing, and the free-style element of the floral stamps, dies and alcohol ink technique DSP are just so very pleasing to the eye and to create with. BLISS!!
This suite includes the Artistically Inked Bundle ( Artistically Inked Stamp Set and Artistic Dies on page 97 of the 2021-22 Annual Catalog). The suite also includes the beautiful Expressions in Ink 12”x12” Specialty DSP (watch for the stunning gold metallic veins), and the Expressions In Ink Ephemera Pack for you final gorgeous touches to your creations. I used this amazing suite for the four cards we made at my last stamp camp in July, and cannot begin to tell you how much fun we had and how pleasing the results. I also used this suite for a huge swap, making 30 cards to exchange with other demonstrators!

Thanks card
This was a super easy card to make and I CASE’d it from another demonstrator. The Expressions of Ink Specialty DSP for this creates 6 amazing cards by cutting it in half horizontally, then into 4” strips vertically, and cutting off the excess white at both ends (see pic below in gallery). However, I cut the card to the left into 3-3/4” widths, and 5” height, so I could layer on a 4”x5-1/4” piece of Old Olive CS, and then on a 4-1/4”x5-1/2” Basic White CS card base (8-1/2”x5-1/2” folded in half). I then used the Artistic Dies to cut out the leaf using the Gold & Rose Gold 6”x6” Metallic Specialty Paper. I stamped the “Thanks”
using the Artistically Inked stamp set in Old Olive ink, and then added the Gilded Gems for accent. As Shelli says “Never a naked envelope”, I stamped the envelope using the inked stamp with Old Olive and Pear Pizzazz ink. Easy peasy!! Tip: use wax paper between your intricate dies and your cardstock and specialty papers to get them to easily fall out of the dies. More photos below

Happy Birthday card
This was another easy card I CASE’d from another demonstrator using the Artistic Dies and the new glimmer Ombre Specialty Paper. This paper transitions from light to dark, and so depending on where you cut from, you get a different color (this example goes from Balmy Blue to Night of Navy). Over a base card (4-1/4” x 5-1/2”) We used the Blending Brush to add a hint of color (I used Pacific Point ink on this card) just under the die cut floral image on a 4”x5-1/4” piece of Basic White CS, popped up with Stampin’ Dimensionals. I stamped the greeting using the Memento Tuxedo Black ink on Basic White CS, then added the silver cord from
Simply Elegant Trim, and the Rhinestones Basic Jewels. Not shown was the envelope with a hint of color using the Blending Brushes and Pacific Point Ink at the left corner of the envelope front and the left corner of the envelope flap. More photos below…

Hello card
This sweet little card was a CASE’d card, but with an “Angela” twist. The Pale Papaya with gold metallic touches are just stunning!! I used the larger Basic White Assorted Memories & More Card Bases & Envelopes for this card and used a 4”x6” piece of the Expressions of Ink Specialty DSP. I stamped using the Artistically Inked stamp set and
layered 3-roses using Pale Papaya ink and the 3-sets of leaves using Pear Pizzazz ink over the Old Olive/Pretty Peacock 3/8” Ribbon, a piece of the Expressions in Ink Ephemera Pack gold foil precut pieces. For the “Hello”, I used Gold Embossing powder on a piece of Basic White CS, then cut it out using the sweet littlest of the Scalloped Contour dies. As a final touch, I added the Artistry Blooms Adhesive-Backed Sequins in Mango Melody. Hint: use waxed paper over your embossed image when you need to die cut after embossing to preserve your image. More photos below…

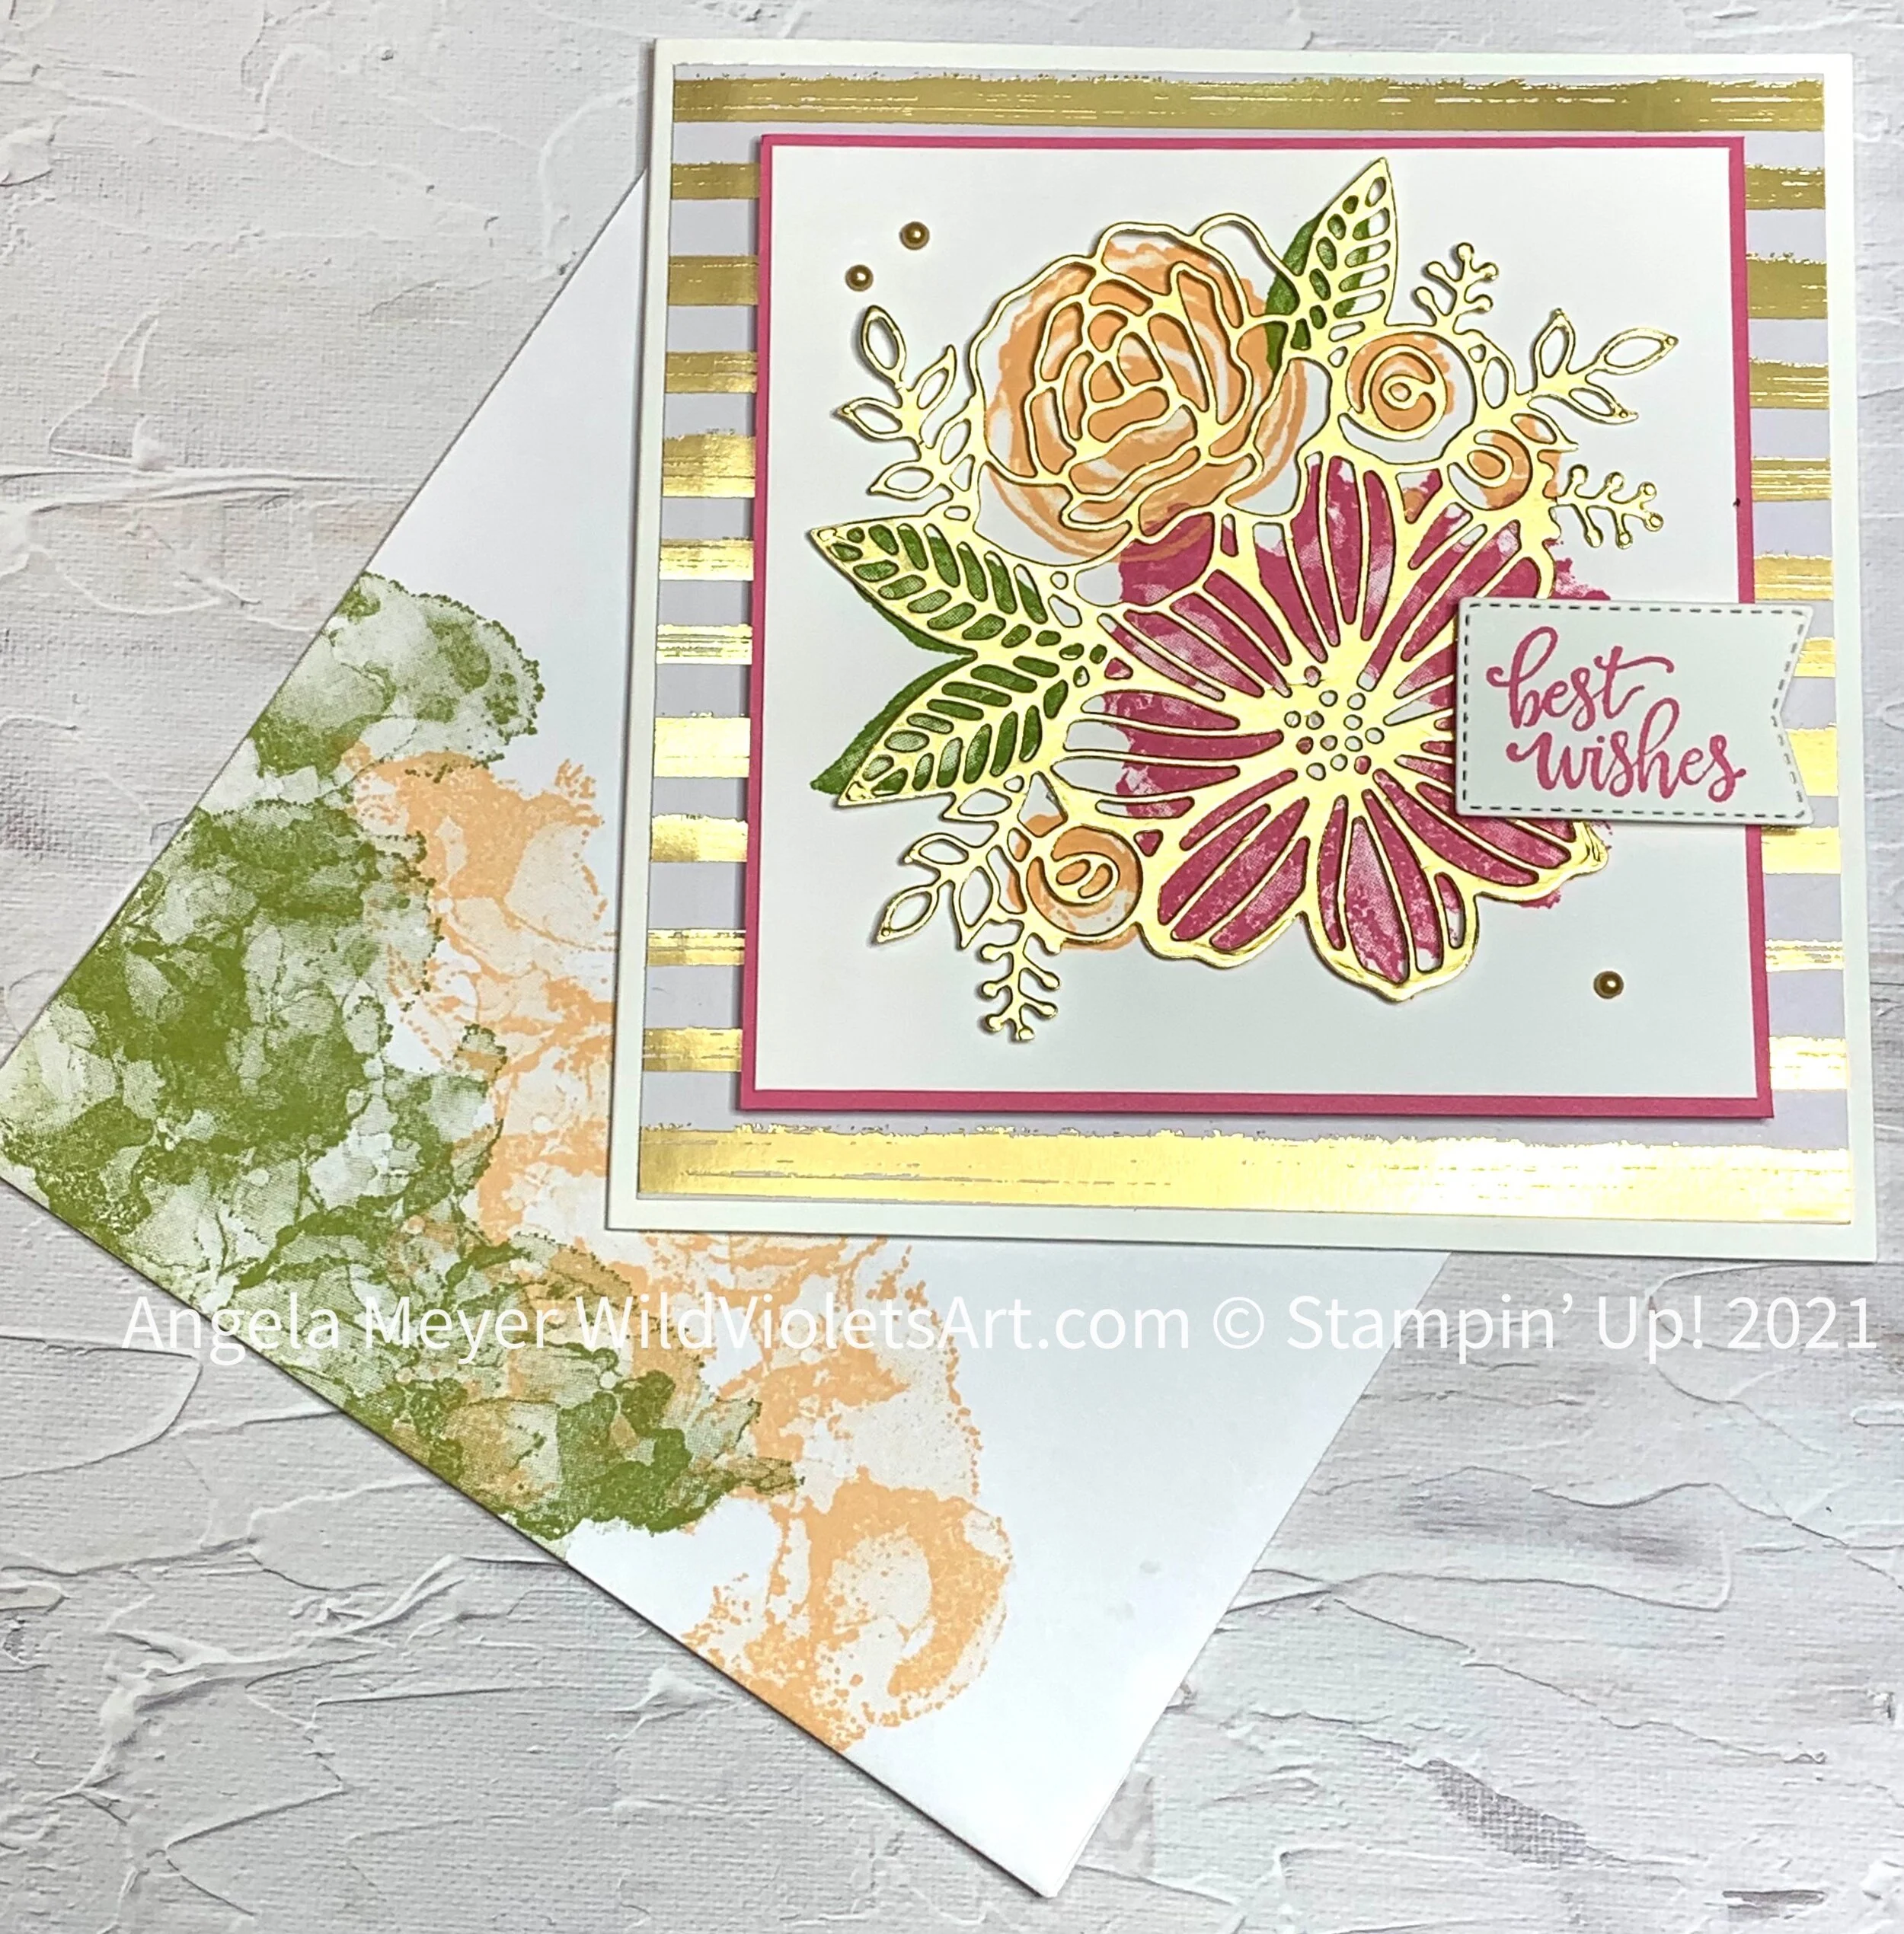
Best Wishes card
This lovely 5-1/4”x5-1/4” square card is utilizing the ever amazing Stamparatus to line up the Artistically Inked stamped image with the Gold Foil Artistic die cut image. I used a 4-1/8”x4-1/8” square piece of Basic White CS, utilized the magnets to hold it in place on the grid of the Stamparatus. I then taped down the die cut image (using washi tape) centered on the CS. I placed the largest flower rubber down over the larges die cut flower, lined up where I wanted it, then pressed down with one of the Stamparatus
plates. I repeated the process for the smaller flowers (all 5) on another plate. I then used the backside of one of the plates to set the leaves. Once everything is lined up, remove the Gold Foil die cut piece and experiment on a scrap piece of paper to make sure everything is where you want it. Hint: do not look for perfection - this is an loose artsy look. Ink you stamps (I used Polished Pink, Pale Papaya, and Pear Pizzazz inks), and then press down for each color. Turn the plate over for the last side. Your stamped image should then be layered (glued) on a 4-1/4”x4-1/4” piece of the Polished Pink CS, then pop up with Stampin’ Dimensionals over a 5”x5” piece of the gold striped Expression in Ink Specialty DSP. I adhered the gold foil die cut floral element with Glue Dots. I stamped the verse with Polished Pink ink, and then die cut it with the banner Tasteful Label dies and popped it up with Stampin’ Dimensionals. The last touch was the gold Metallic Pearls. More pictures below…
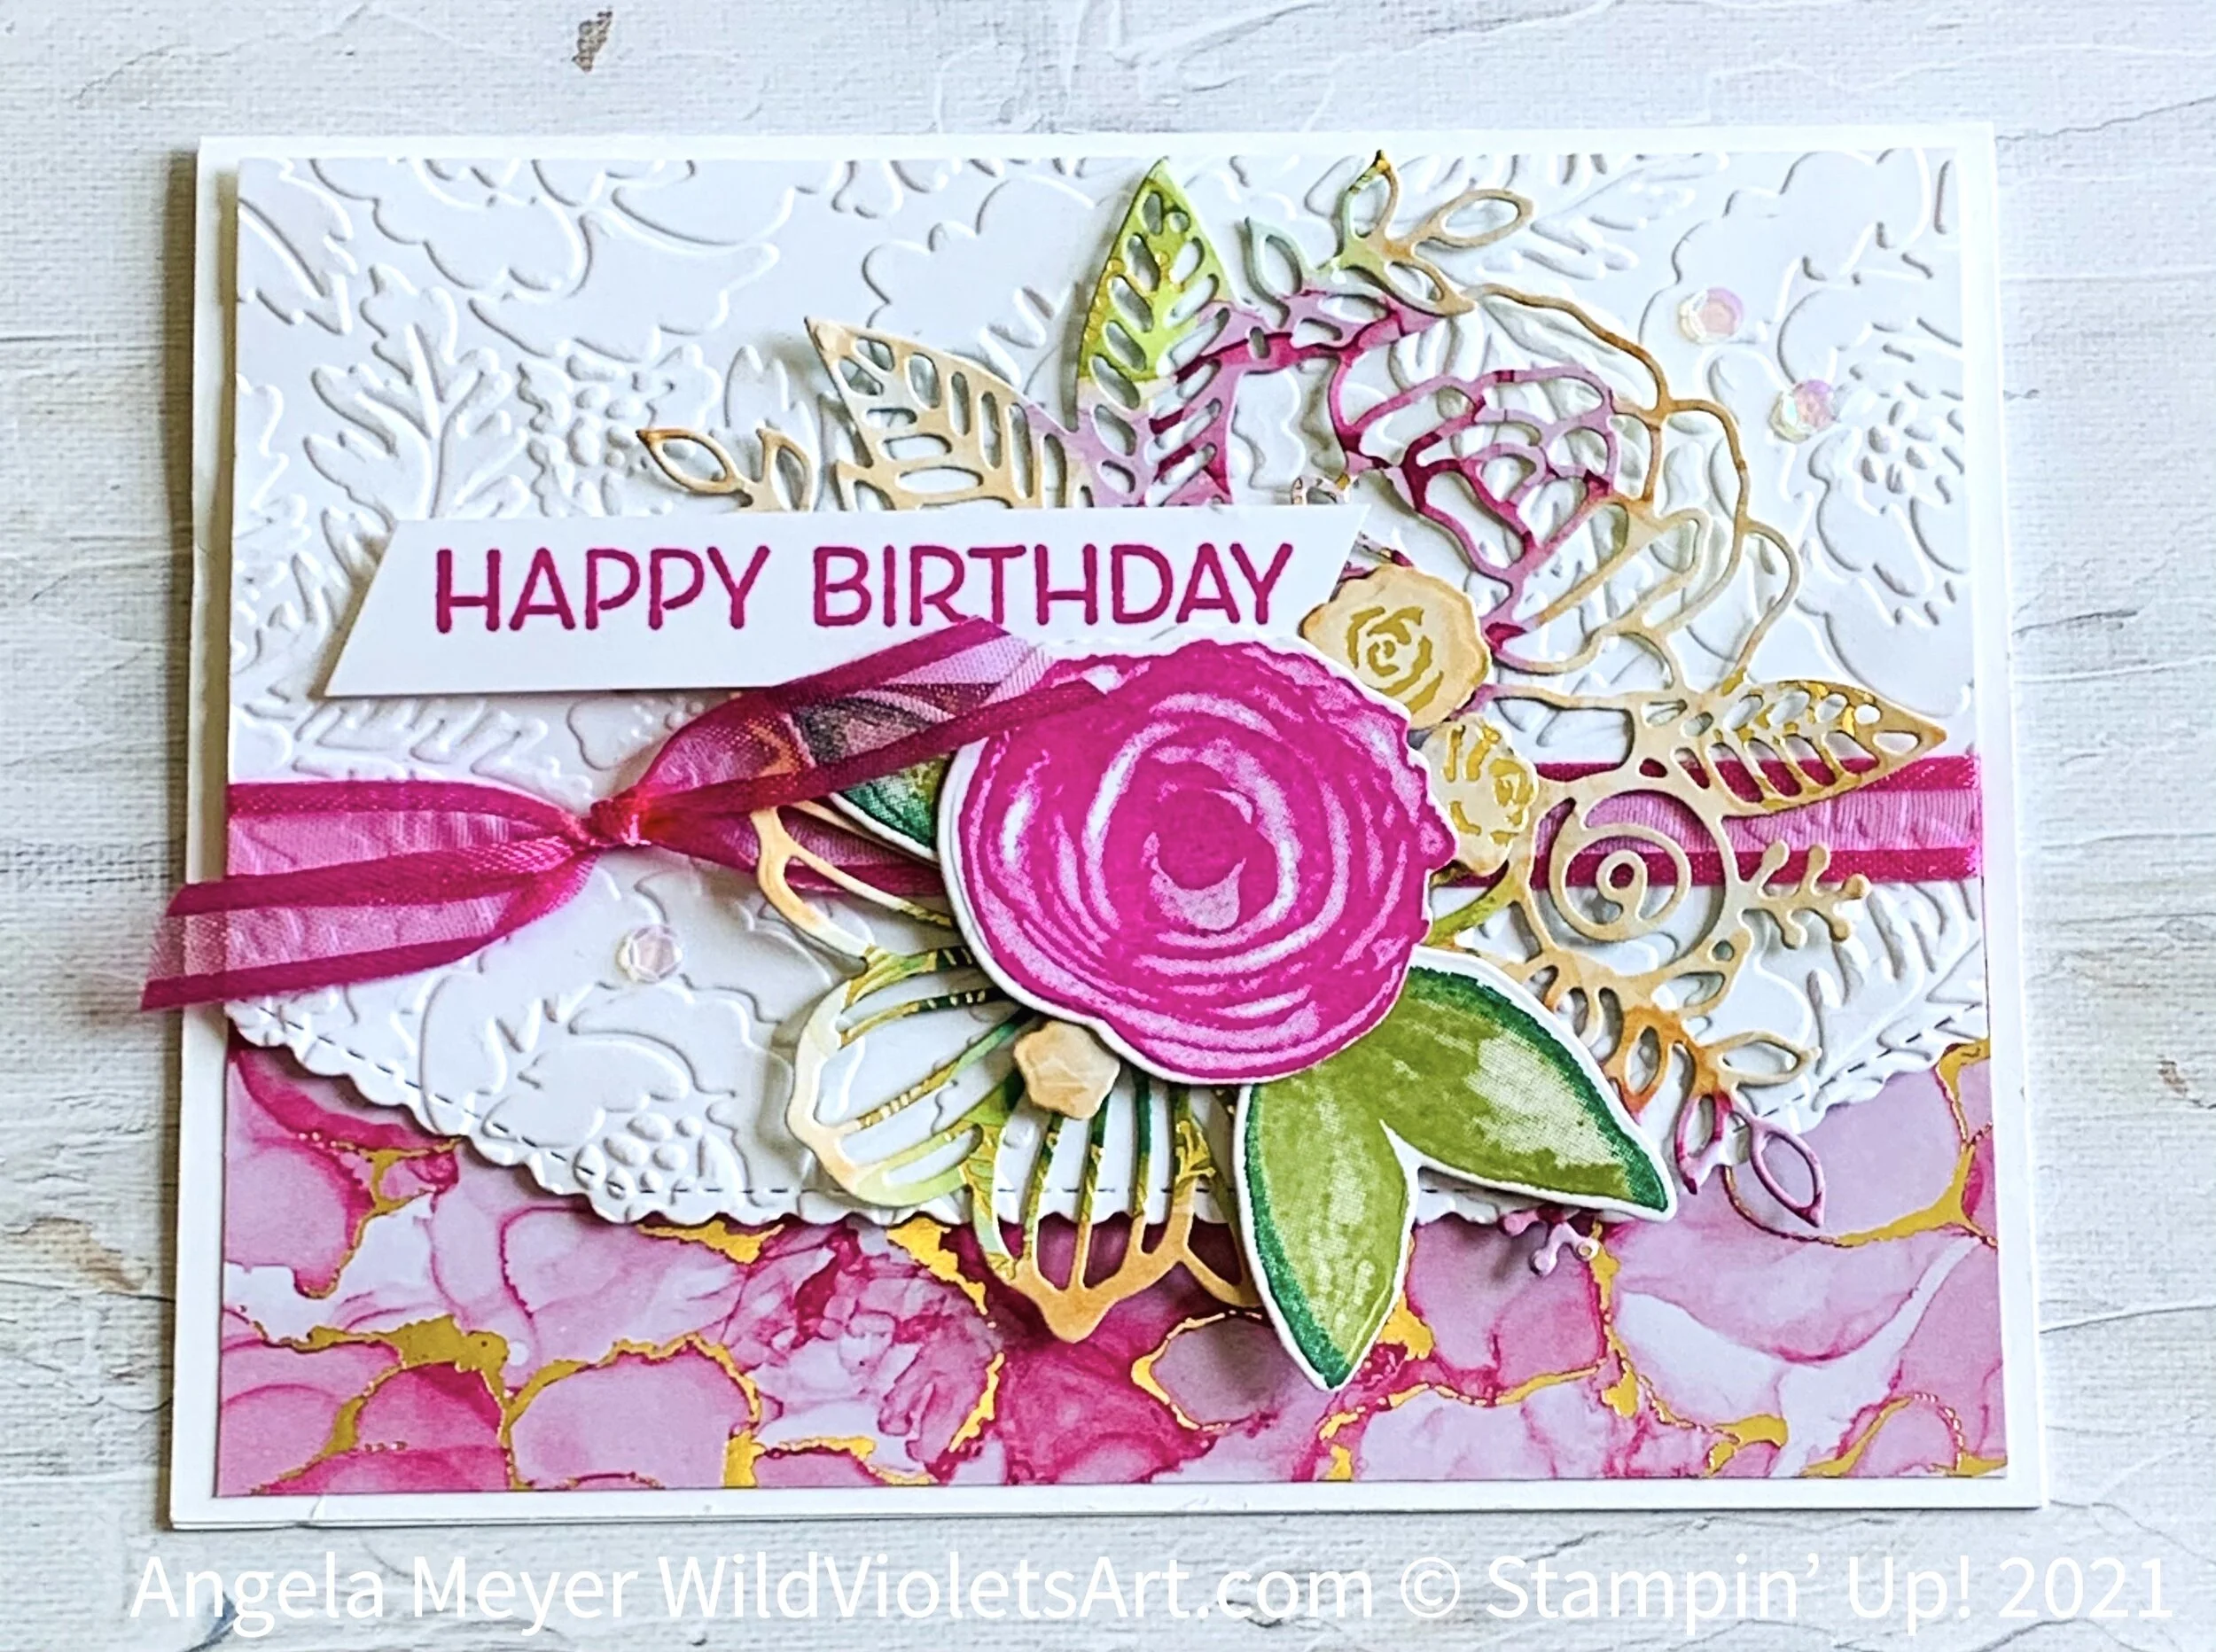
Happy Birthday (2) card
I made 30 of this stunning creation for two swaps - a lot of work, but so much fun. I used the Pretty Flowers EF on Basic White CS that was cut to 3-1/2”x5-1/4”. I first die cut the long side with one of the Basic Borders Dies (pg 162 of the Annual Catalog), then embossed the piece. I glued a piece (3”x5-1/4”) of the Polished Pink and gold veined
Expressions in Ink Specialty DSP on the Basic White Thick CS base card (4-1/4”x5-1/2”), then popped up the embossed piece over it, after adding a length of the 3/8” Open Weave Ribbon in Polished Pink, and tying a knot. I cut out the large pierced floral die with Artistry Dies from the Expressions in Ink Specialty DSP that had the floral design with gold elements. Over that, I used the smaller rose stamped in Polished Pink and die cut. The leaves were stamped with Old Olive ink, then tipped with Garden Green ink and die cut. I used the scraps from the large floral die and cut out the gold leafed Pale Papaya centers with the small trio of flower dies. I popped them up with Stampin’ Dimensionals as well. The verse was stamped with Polished Pink on a 1/2” wide strip of Basic White CS, and free hand cut the angled ends. I then added the adhesive backed pale pink sequins from the Expressions in Ink Ephemera Pack. More pics below…